Data has a tendency to grow and every now and again needs some pruning. Flat files can be a big offender, particularly if you’re looking at transactional data or a backup repository for example.
If you’re looking to script this process for cleaning up then PowerShell may be a great choice. It’s freely available, quick to set up, and easy to read for anyone who comes along later. It’s also pretty straight forward to get the scripts scheduled up in your environment to run on a schedule.
It could be worth asking around before you look at putting any scripts in place to see if there’s a particular retention policy for the data you’re dealing with. Undeleting is somewhat more challenging.
Scripting the Clean Up
This isn’t a primer on PowerShell. Fundamentally you’re able to run commands to take actions or provide results, and once we have results then we can pass these through to another command with the magical pipeline operator (|).
For this script we’ll take the Get-ChildItem command, pass through to a Where-Object filter and finally Remove-Item to clean things up. There’s a range of parameters for each of these so it’s worth taking a look at the documentation or experiment with the intellisense in the IDE.
For example if we have some database backups in paths similar to X:\ServerName\DatabaseName\BackupType\Somefile.bak and we wanted to prune it down then we could use a script similar to the below:
Get-ChildItem -Path X:\ServerName -Filter *.bak -Recurse | Where-Object { !$_.PSIsContainer -and $_.LastWriteTime -lt (Get-Date).AddDays(-7) } | Remove-Item -WhatIf
Walking through each of the commands we’re using and what they’re doing here:
- We want to recursively (include any sub folders) go through all of the files and folders within the
ServerNamepath looking for the backup files (withbakextension) - Once we have them we want to exclude folders (the
PSIsContainerflag) and only where the write time is older than our retention period. In this case we’re saying anything older than 7 days old but you can useAddMinutes,AddHours, orAddMonthsas alternatives - With the filtered results we want to remove those from the file system (and don’t forget to test with the
WhatIfswitch! – intentionally left to avoid copy-paste disasters)
That’s it, as simple as that. You could parameterise elements if you’re reusing any – such as retention period across multiple commands – but just that one line should get you started.
Scheduling the Cleanup
I’ll caveat this that if you have automation solutions available to you which can deal with the purging or scheduling for you then these may be preferable. Scheduling jobs locally on the server can be trickier to get alerting from and harder to track down when ‘something isn’t working’. With that said…
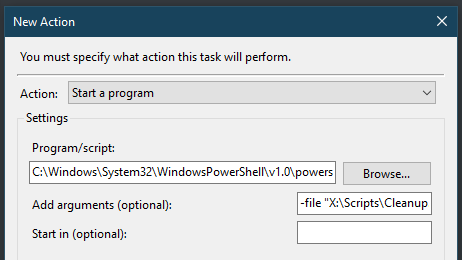
So we’ve got a script ready to keep things clean but we don’t want to keep running it manually so we’ll lean on the old faithful task scheduler to get it to run periodically. I won’t go into how to set up a full task, that should be pretty straight forward. However to get the PowerShell script to run correctly it’s a little different than the usual pointing the Action to the script file we just created. What we need to do is get the job to call PowerShell and pass the script in as a parameter.
Within the Action dialog you’ll be selecting Start a program as normal and then the Program should be set to the path of your PowerShell executable. On my server I’d be looking at C:\Windows\System32\WindowsPowerShell\v1.0\powershell.exe. Then to get our script to run we need to use the parameter to pass this in. So if my script was in X:\Scripts\Cleanup.ps1 then I’d set the argument as -file "X:\Scripts\Cleanup.ps1".
That’s it for the task too, nothing too mind blowing or ground breaking but hopefully it might just come in handy in a pinch.
One note with the Task Scheduler approach which you may need to be mindful of is the account which the task is running under and ensuring it’ll have access and privileges to remove the files so make sure you give it a test after it’s set up.
