With the arrival of SQL Server 2016 we were provided with a new feature in the engine called System Versioned Temporal Tables – typically shortened to Temporal Tables. These tables allow us not only to query the data as it currently is, but also query it at any point in the past too as it retains a version history of the data and how it has changed over time. This versioning is managed by the SQL engine hence why it is called ‘System Versioned’
This feature lends itself really nicely as an audit tool which can be applied without making application changes and it’ll allow us to both see when changes were made, and also query the data in whatever state it was in at a particular point in time. Another situation where it may be useful would be taking the current and historical data together to support building a slowly changing dimension.
What can they do
Let’s take a look at what querying a temporal table might look like to get things rolling. I won’t include the creation part here, I want to show how the querying process works initially:
/* Make some changes */
UPDATE TemporalSample
SET StockQuantity = StockQuantity + 2;

/* What is the current data? */
SELECT *
FROM TemporalSample;

/* Let's go back 2 seconds */
DECLARE @OldDataTime DATETIME2 =
	DATEADD(SECOND, -2, GETUTCDATE());

/* What _was_ the data like? */
SELECT *
FROM TemporalSample
	FOR SYSTEM_TIME AS OF @OldDataTime;
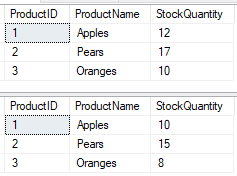
Look at that, we can go back in time!
All it needs is that extra clause adding into the FROM clause to indicate which time period we’d like to look at the data from and we can jump back to whatever time we need. You can even jump back to before the table was created, although as you’d expect there will be no records returned in that case.
How do we create them
Creating a temporal table is identical to creating a typical table but with a few extra elements sprinkled inside the declaration. An example of the creation statement is below:
CREATE TABLE dbo.TemporalSample
(
  ProductID INT PRIMARY KEY,
  ProductName VARCHAR(100),
  StockQuantity INT,
  StartDate DATETIME2 GENERATED ALWAYS AS ROW START,
  EndDate DATETIME2 GENERATED ALWAYS AS ROW END,
  PERIOD FOR SYSTEM_TIME (StartDate, EndDate)
 )
WITH (SYSTEM_VERSIONING = ON);
The first thing to point out here – which isn’t specific to temporal tables – is that we’ve defined a primary key for this table. This is important as a temporal table must have a primary key defined in the table definition.
Onto the more specific elements here, we can see there are a few new fields specified which are the start and end timestamps for the record, and the PERIOD which covers those dates. The names for these timestamps is only relevant for specifying the period. Both of the timestamps must be specified as GENERATED ALWAYS AS ROW and then START or END as applicable. This is effectively boilerplate temporal structure which we need to include.
The final element is the additional option at the end to turn the table into a temporal table and enable the system versioning. If you don’t have the fields above available then this will fail. Once that’s all done however the table can be created and we’ll see in in Object Explorer with a slightly different table icon and some text indicating that it’s temporal:

Extending the creation
In addition to the options above there were another couple of points which are worth noting with the creation of the table.
When we create these tables and folks start to use them you may sometimes get queries about these new timestamp fields and what they’re used for and what should be done with them, does the app code need to be changed to manage them or ignore them, etc. A way to avoid any potential issues with new fields popping up can be to mark them as HIDDEN in the definition which will mean they don’t appear in the SELECT * queries against the table. This was why in our first example you don’t see the timestamp fields.
The hiding of fields isn’t specific to temporal tables but the feature can certainly be leveraged here to help with the adoption of new temporal tables.
In addition to this we can extend the SYSTEM_VERSIONING option to explicitly define the table where we want to store our history data. Yes, the history is also stored in another table which isn’t seen under the Tables node in SSMS but its good practice to add one of these yourself as you’ll otherwise get an auto generated name with little meaning to anyone who might see it.
If we were to make these changes to our creation statement above then it would now look a little like this:
CREATE TABLE dbo.TemporalSample
(
  ProductID INT PRIMARY KEY,
  ProductName VARCHAR(100),
  StockQuantity INT,
  StartDate DATETIME2 GENERATED ALWAYS AS ROW START HIDDEN,
  EndDate DATETIME2 GENERATED ALWAYS AS ROW END HIDDEN,
  PERIOD FOR SYSTEM_TIME (StartDate, EndDate)
 )
WITH (
	SYSTEM_VERSIONING = ON (
		HISTORY_TABLE = dbo.TemporalSampleHistory
	));
You’ll see we’ve marked the timestamps as HIDDEN and we’ve also specified the table name to use for the history as part of enabling the system versioning. We’ll come back to this history table at another time. Now let’s get to making use of this new table.
Inserting data into the table
Inserting data into a temporal table is no different to how we’d insert into a regular one as the extra columns which we added in the definition are managed by the system so we can simply specify the field names and values. From our earlier example the INSERT statement was as follows:
INSERT INTO TemporalSample (
	ProductID,
	ProductName,
	StockQuantity
)
VALUES (1, 'Apples', 10),
	(2, 'Pears', 15),
	(3, 'Oranges', 8);
Putting it all together
Now that we’ve worked through what they can do, the creation of them and inserting data into a temporal table, we’ll put everything together into a single statement to see it in action:
/* Create our table */
CREATE TABLE dbo.TemporalSample
(
  ProductID INT PRIMARY KEY,
  ProductName VARCHAR(100),
  StockQuantity INT,
  StartDate DATETIME2 GENERATED ALWAYS AS ROW START HIDDEN,
  EndDate DATETIME2 GENERATED ALWAYS AS ROW END HIDDEN,
  PERIOD FOR SYSTEM_TIME (StartDate, EndDate)
 )
WITH (
	SYSTEM_VERSIONING = ON (
		HISTORY_TABLE = dbo.TemporalSampleHistory
	));

/* Add some data to play with */
INSERT INTO TemporalSample (
	ProductID,
	ProductName,
	StockQuantity
)
VALUES (1, 'Apples', 10),
	(2, 'Pears', 15),
	(3, 'Oranges', 8);

/* We'll wait a few seconds */
WAITFOR DELAY '00:00:03';

/* Make some changes */
UPDATE TemporalSample
SET StockQuantity = StockQuantity + 2;

/* What is the current data? */
SELECT *
FROM TemporalSample;

/* Let's go back 2 seconds */
DECLARE @OldDataTime DATETIME2 =
	DATEADD(SECOND, -2, GETUTCDATE());

/* What _was_ the data like? */
SELECT *
FROM TemporalSample
	FOR SYSTEM_TIME AS OF @OldDataTime;
Wrap up
In this post we’ve had a quick introduction to temporal tables and seen how they can be created and used. Hopefully this will give you a good baseline of understanding and see if they might be a good fit for your own situation.
There’s certainly more to dive into with these so we’ll follow up with a couple more posts around querying these types of table and how we’ll go about modifying the structure of the table if needed in the future.
As with most of the features in SQL Server you can read more about the details in the online documentation.

4 replies on “Introduction to Temporal Tables”
[…] Last time out we took a brief look at temporal tables, how to create them and what they can do for us. This time I’d like to dive a bit deeper into them and see how they look under the covers. For this we’ll be using the same table which we ended up creating previously: […]
[…] our initial introduction we briefly saw how to query temporal tables but there were a couple of specific bits which I wanted […]
[…] we’ve been looking at temporal tables including the basics for using them and options for querying them. Continuing with this theme – and given that tables rarely […]
[…] Introduction to temporal tables […]