
Shifting from handling data on premises to Azure has been a real change of mindset. Whilst what I want to build may be similar, the how part is completely different. There’s a learning curve not just to the tooling but how you use it too.
This is one of those instances.
I had a storage container with files which had a date in their name. I wanted to perform a wildcard search to select some of them. That sounds straight forward, right?
Not so.
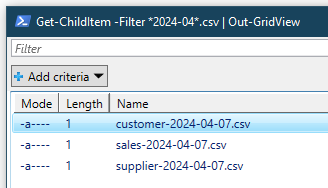
Here are some files to demonstrate:

Searching
Finding local files would be really easy. Using PowerShell, let’s look for the ones from April:
Get-ChildItem -Filter *2024-04*.csv | Out-GridView
Now for the same in Azure.
The files have been uploaded into a storage container so we have a similar setup in place:
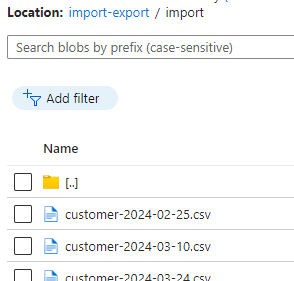
The container has a Search field, but this only allows us to search by prefix which doesn’t help our search for a specific date as it’s not at the start:

As far as I can tell there’s no way to perform this search in the Azure portal or via the Storage Explorer tool which is also offered.
Powershelling
So we shall resort to scripting! There’s a little prep we need to do first.
First off we’ll need to install the Azure Storage module:
Install-Module -Name Az.Storage
If you haven’t used the PowerShell Gallery to install from previously you may need to trust the repository:

With the module installed you can now Import it so that the functions inside can be used. Or maybe not. If you’re running this on a desktop rather than a server the default policy is Restricted so you may see an error like this:

If that’s the case then you can change your execution policy. This is a security setting so you may want to read more about them first. I chose the RemoteSigned option which is the default for servers:
Set-ExecutionPolicy -ExecutionPolicy RemoteSigned
With that in place the Import command now works correctly:
Import-Module -Name Az.Storage
Half way there.
Now we need to connect up to our Azure account and the storage within it. Connecting is pretty easy as we can pop in the command below and be prompted for credentials needed to access your environment:
Connect-AzAccount
For me this opened a browser for me to log into with two factor authentication.
Once connected we need to set the current storage account to indicate which we want to use when issuing subsequent commands. We need to direct it to a resource group and the name of the storage account within:
Set-AzCurrentStorageAccount -ResourceGroupName "blog" -Name "blogstorage"
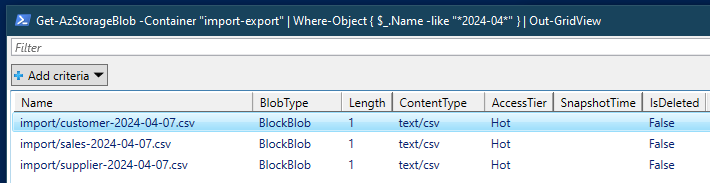
Now that we’ve got the module installed, imported, and we’ve signed into Azure and connected to a storage account – we can now get a list of the files.
To do this we’ll make a calls to get the blobs within our storage container and then pass the results through to be filtered. This will produce the same results as our earlier local search:
Get-AzStorageBlob -Container "import-export" | Where-Object { $_.Name -like "*2024-04*" } | Out-GridView
Wrap up
Here we’ve looked at using PowerShell as an alternative to the built in search function for Azure Containers if that doesn’t support your needs.
We’ve covered installing the Azure Storage module into PowerShell, loading the module, and then how to connect to our Azure account and the specific Storage resource in there. Once we’ve got to that point the search function is similar to what we’d expect on a desktop environment.
I’m still learning my way around Azure so someone may tell me there’s a much better or easier way to do this. If that’s the case then please pop something in the comments so that myself and others can learn.

One reply on “Searching Azure Storage Containers with Powershell”
[…] Andy Brownsword hits one of my bugbears: […]