If you’ve been using Database Projects for simply maintaining copies of your database objects – like I used to – then you’ve been missing out on the power of its deployments. Initially I was sceptical about how it could effectively perform upgrades but after seeing them land in SSMS last month I wanted to revisit them as a means of actual deployment.
My scepticism was completely misplaced, so if you haven’t touched Database Projects before – or had similar concerns as me – I want to demonstrate 3 features which make them not just good, but amazing for deployments.
Refactoring handles changes
Changing existing elements such as table or column names can be troublesome when deploying. For example renaming the dbo.Posts table to dbo.Topics would cause the deployment to want to drop and recreate the table:
DROP TABLE [dbo].[Posts];
GO

PRINT N'Creating Table [dbo].[Topics]...';
GO

CREATE TABLE [dbo].[Topics] (
    [Id]                    INT            IDENTITY (1, 1) NOT NULL,
    [AcceptedAnswerId]      INT            NULL,
    ...
This isn’t how you want deployments to go.
Thankfully there is a solution in the form of Refactoring. When working on a SQL object we can right-click on element names (table, column, etc.) and choose Refactor. There are various options including Rename. This allows you to preview all the changes you’d typically need to make by hand to rename the object:
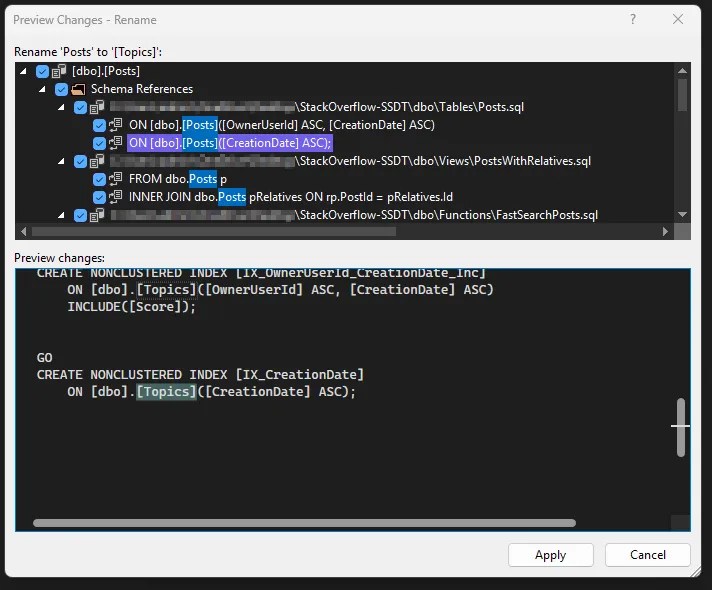
That’s all well and good, but you could do that part yourself. In itself that doesn’t solve the issue with deploying the updated object. What does solve this is the Refactor Log.
After refactoring, a new file will be added to the solution which details the refactor which has taken place. This is only done when using the Refactor tool – any manual changes to the scripts will not be reflected here. After the rename above, the log shows this:
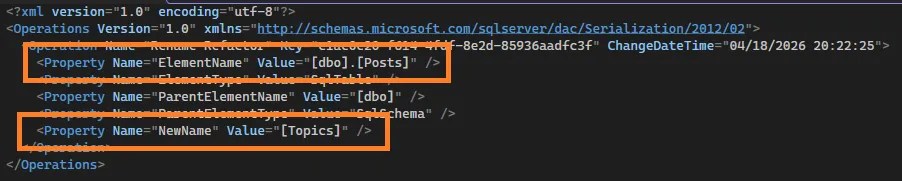
That file tells the project about the renaming so when it goes to deploy, it doesn’t need to drop and recreate, but simply rename the object. A deployment now will contain the following:
PRINT N'The following operation was generated from a refactoring log file c1ac0e20-f614-4fdf-8e2d-85936aadfc3f';

PRINT N'Rename [dbo].[Posts] to Topics';
GO

EXECUTE sp_rename @objname = N'[dbo].[Posts]', @newname = N'Topics', @objtype = N'OBJECT';
GO
Now that’s what we’d want to see, a safe rename rather than a destructive rebuild.
Pre/Post scripts handle data
The ability to run SQL scripts around deployments are crucial. Where the project handles the database objects, scripts can be used to handle the data side. With Database Projects we have Pre and Post Deployment scripts.
For example, applying and enforcing default data on deployment ensures the correct state of the database. Consider an OrderStatus table which should contain a limited enumeration, and where you’d want those defined within source control.
Adding a ‘Post-Deployment Script’ (or manually setting the build option) ensures that after every deployment, the data can be left in a standardised state, even if the schema hasn’t changed. You can throw your favorite upsert/MERGE into the script, and you’ve got source controlled and enforced default data. For example:
DECLARE @OrderStatuses TABLE (
    OrderStatusID INT,
    OrderStatusName VARCHAR(50)
);

INSERT INTO @OrderStatuses
VALUES (1, 'Created'),
    (2, 'Processing'),
    (3, 'Complete'),
    (9, 'Cancelled');

UPDATE os
SET os.OrderStatusName = x.OrderStatusName
FROM dbo.OrderStatuses os
    INNER JOIN @OrderStatuses x ON os.OrderStatusID = x.OrderStatusID
WHERE os.OrderStatusName <> x.OrderStatusName;

INSERT INTO dbo.OrderStatuses
SELECT x.OrderStatusID,
    x.OrderStatusName
FROM @OrderStatuses x
    LEFT JOIN dbo.OrderStatuses os ON x.OrderStatusID = os.OrderStatusID
WHERE os.OrderStatusID IS NULL;

/* Add optional delete if needed */
To elevate this further you can add scripts not included in the build, and use some SQLCMD syntax to include them as a single post-deployment script. The added advantage of this approach is that you control execution order which is especially useful when you have large scripts to split, or referential integrity to maintain.
Referencing other files via SQLCMD is really easy too – here’s the project layout and the SQLCMD script:
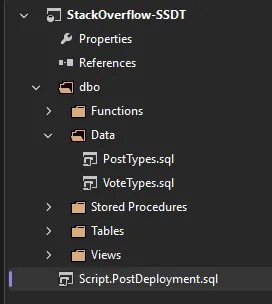
/* SQLCMD to include content from other files */
:r .\dbo\Data\PostTypes.sql
:r .\dbo\Data\VoteTypes.sql
Now with carefully crafted scripts we’re able to manage the state of our data in the same place as the schema.
Publish settings handle configuration
Publishing a project is where it all comes together, but its not only about the schema and the data we’ve looked at already. How and where we publish are a crucial part of that puzzle – that’s where we arrive at Publish Configuration.
You want to be confident in the state of your database after a deployment, not only in what’s specified within your project files, but also anything which isn’t. To support this, the publish dialog has a multitude of options under its advanced settings, including:
- Drop tables not in your project? – to tidy up after your engineer
- Ignore indexes not in the project? – you can let your DBA off
- Backup your database before deployment? – because any issues after deployment are yours by default
There are options covering RLS, CDC, triggers, and more. These allow precise control over objects outside your project and how the deployment should handle those. This gives reassurance your database will be in a known, valid state following deployment.
A useful option here – one which Simon Frazer pointed out to me recently – is Smart Defaults when marking columns as NOT NULL. This allows you to easily add NOT NULL fields as the deployment will set the column value to something generic, for example below:
/* Change column to NOT NULL */

UPDATE [dbo].[Users]
SET    [AboutMe] = N''
WHERE  [AboutMe] IS NULL;

ALTER TABLE [dbo].[Users]
ALTER COLUMN [AboutMe] NVARCHAR (MAX) NOT NULL;


/* Add new NOT NULL column */

ALTER TABLE [dbo].[Users]
    ADD [LifetimePoints] INT NOT NULL,
        CONSTRAINT [SD_Users_788b354fb3ae48949dabf0f5c22890b1]
        DEFAULT 0 FOR [LifetimePoints];

ALTER TABLE [dbo].[Users]
DROP CONSTRAINT [SD_Users_788b354fb3ae48949dabf0f5c22890b1];
If you need more specific values set, we’ve seen post-deployment scripts above which slot right in here to update the fields with specific logic.
Now, after all that work scrolling through 100s of options, the last thing you want is trying to remember which 3 you ticked last time you deployed, and which is that 1 option which you really shouldn’t enable. That’s why we have publish profiles.
Through the publish dialog you can choose to save a profile into your solution. This creates a file which stores your Advanced settings as well as the connection to your target.
Plus you can save multiple profiles.
So your solution can contain deployment profiles for all your environments from development to production, and they can have different configuration for each environment – a production deployment can leave the database in a specific state, but for development you might not want to drop any additional changes or indexes which are from a separate code branch.
Perfect for collaborative development.
Wrap up
I’ve used database projects for years as ‘this is the shape of my database’, but never for deployments. I’m gutted I didn’t dive into them until recently.
The 3 killer features we’ve looked at here are:
- Refactoring – to show when objects have changed and you need
ALTERinstead ofDROP/CREATE - Pre/post deployment scripts – to include data in source control and ensure consistent states pre/post deployment
- Publish settings – to control how you want to deploy and fine-tune what an acceptable post-deployment state looks like
Working through typical deployment patterns, these features come together to provide a comprehensive schema, data, and deployment approach for database solutions. Using a Database Project doesn’t remove the need for efficient scripting entirely – in fact scripting through pre and post deployment scripts adds a lot of flexibility – but it condenses the usage down to only the parts you need to control.
Over the next few weeks we’ll go deeper. I mentioned at the start that Database Projects have landed in SSMS so next week we’ll specifically focus on the tooling that’s available (or not) in there. There are also a couple of other killer features which didn’t make the top 3 here, but can be incredibly useful for the right project. Stay tuned!

4 replies on “Database Projects are Amazing for Deployments”
[…] Andy Brownsword is sold: […]
[…] Database DevOps (preview) workload introduced which brings with it Database Projects. Last week I shared my favourite features for them which make deployments […]
[…] I mentioned recently, there are plenty of Advanced options when publishing. Combining that with connection to the […]
[…] data solutions can span multiple databases. I’ve recently shared how amazing Database Projects can be but objects which reference across database boundaries can throw up warnings. Is the code solid or […]